Table of Contents
Products and Plans
Products
What a Product is
For a definition of what a Product is in the SubscriptionBridge system, please see the Glossary.
Adding a New Product
To add a new Product to one of your stores, do the following:
- Click on Stores in the Merchant Center navigation
- Select the Store that you wish to work with
- Under Packages, select Products
- Click on Add New Product
Main Product Properties
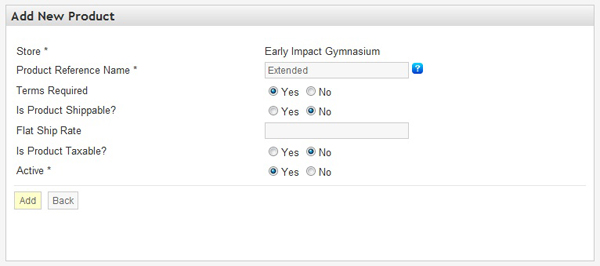
The following main properties are available on the Add New Product page.
- Product Reference Name
This field is required. The Reference Name is the product's name within the SubscriptionBridge Merchant Center. It is not shown to customers. It helps you quickly identify the Product in the Merchant Center, so it does not need to be customer friendly, but rather useful to you and your staff (e.g. it could be an internal product code that you and your staff are familiar with). - Terms Required
This setting only applies if you are using the Simple Integration. If you are using a shopping cart integration, this feature has likely been built into the shopping cart integration and available to you as part of the shopping cart administration features.
You can specify whether customers should be asked to acknowledge and accept a “Terms & Condition” document when activating a subscription for a Package that includes this Product. Since the Terms & Conditions change depending on the front-end language chosen by the customer (assuming you have enabled multiple languages in your store), the Terms & Conditions document is not entered on this page, but rather on the Names & Descriptions page (see below), which supports multi-lingual entries.
- Is Product Shippable?
This setting only applies if you are using the Simple Integration. The settings allows you to indicate to the SubscriptionBridge shopping cart whether a shipping charge should be added to the subscription. - Flat Ship Rate
This setting only applies if you are using the Simple Integration. The settings allows you to indicate to the SubscriptionBridge shopping cart what the shipping charge should be. If you need a more complex kind of shipping calculation (e.g. dynamically retrieving shipping rates from UPS or FedEx), we recommend that you use an e-commerce system that supports SubscriptionBridge and that matches your needs. You can find a list under Shopping Cart Integration. - Is Product Taxable?
This setting only applies if you are using the Simple Integration. The settings allows you to indicate to the SubscriptionBridge shopping cart whether the product/service is taxable. Taxes will be calculated as described under Tax Settings. If you need a more complex kind of tax calculation, we recommend that you use an e-commerce system that supports SubscriptionBridge and that matches your needs. You can find a list under Shopping Cart Integration. - Active
This field defines whether the Product is active or not.
Names & Descriptions
SubscriptionBridge supports a multi-lingual front-end (the Merchant Center, instead, is only available in English at this time). Therefore, you can add Names, Descriptions, and Terms & Conditions for your Products in each of the languages that you have activated for your store.
To do so, navigate to the Products page as described above, and then click on Names & Descriptions. On the page that is displayed to you, click on the “Add New Name/Description” button to add Product Name, Description, and Terms of Use (if needed) in each of the languages that you have activated for the selected Store.
On the Add New Name/Description page…
- Language
Select a language from the list of active languages for the Store - Name
Enter a name for this Product in the Language you have selected. This entry is shown to customers in the SubscriptionBridge front-end (e.g. in the SubscriptionBridge Shopping Cart, Customer Center and in e-mail Notifications). - Description
Enter a description for this Product in the language you have selected. This entry is shown to customers in the SubscriptionBridge Shopping Cart only. Descriptions are not used in e-mail notifications. - Terms
Enter Terms & Conditions that customers need to agree to when subscribing to this product or service (if applicable). Terms are shown in the SubscriptionBridge Shopping Cart and linked-to from some e-mail notifications.
Once you have added names, descriptions, and terms in multiple languages, the Names/Descriptions page will present them using a tabbed layout where each tab corresponds to a different language. To edit any of the entries, click on the tab that represents the language that you need to edit, and click on the Edit icon ( ).
).
Viewing and Editing Existing Products
To view all the Products that are associated with a certain store in your SubscriptionBridge Merchant Center, do the following:
- Click on Stores in the Merchant Center navigation
- Select the Store that you wish to work with
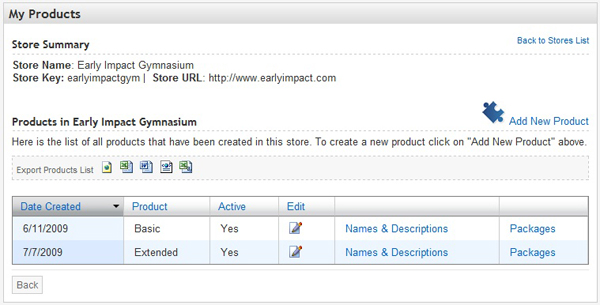
- Under Packages, mouse over Products. The system will display a preview of the products you added to that store. Click on the link to load the list of Products.
On the page that lists all Products under the selected Store you can:
- Click on any column heading to sort the table by that column
- Click on the Edit icon to edit main Product properties
- Click on Names & Descriptions to view and edit the product name and descriptions used in the SubscriptionBridge front-end pages (SubscriptionBridge Shopping Cart and Customer Center) and in e-mail notifications sent by the system.
- Click on Packages to view and edit existing Packages for the selected Product.
Deleting Products
Products that are not currently used within a Package can be deleted. To delete a product:
- Click on Stores in the Merchant Center navigation
- Select the Store that you wish to work with
- In the Packages section, mouse over Products. The system will display a preview of the Products you added to that store. Click on the link to load the list of Products.
- Check the checkbox in the right-side column of the Product(s) you wish to remove, and click on the Delete Selected Records button to remove the selected products. Please note the following:
- Products can only be deleted when not used in a Package.
- When a Product is used in a Package, the checkbox is not shown.
- When no Products can be deleted, the Delete Selected Records button is not shown on the page.
Plans
What a Plan is
A plan defines the billing arrangement (see the Glossary).
Plans are not product-specific. The same Plan (e.g. monthly payment, with a free 2-month trial) could well be shared across different subscription-based products and services.
Payment Gateways and Supported Payment Plans
Different payment gateways have different requirements and limitations with regard to the billing plans that they can support. For example, Authorize.Net does not support a billing period that is shorter than 7 days.
SubscriptionBridge is setup to enforce these requirements/limitations when you create a new plan, depending on which payment gateway you have selected. So if Authorize.Net is the payment gateway selected for a certain store, and the billing period is “days”, then the number of days that can be selected will start at 7.
Authorize.Net also requires that the standard billing and trial billing periods share the same billing unit (days vs. months) and frequency. Therefore - if Authorize.Net is the selected payment gateway - only the total number of trial occurrences can be set.
Adding a New Plan
To add a new Plan, do the following:
- Click on Stores in the Merchant Center navigation
- Select any of your Stores
- Under Packages, select Plans
- The page will display a list of available Plans. Click on Add New Plan to add a new one.
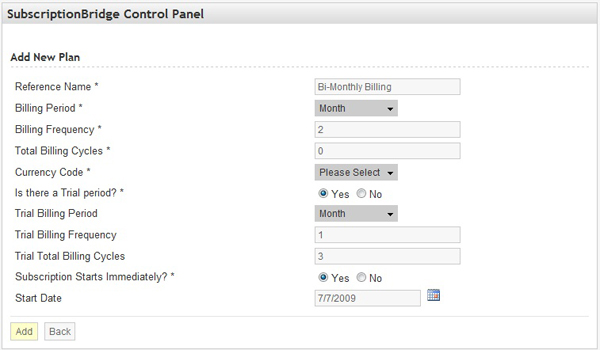
On the Add New Plan form you will find the following fields:
- Reference Name
This is an internal name for the Plan. It is not shown to customers. - Billing Period
Select the billing interval from the following selections: day, week, month, year. You can use the Billing Frequency field to “adjust” the Billing Period. For example, to create a Quarterly Billing Period, choose Month here and then enter 3 under Billing Frequency. - Billing Frequency
Select how often the subscription will be billed, based on the interval selected under Billing Period. For example, if you are selling a bi-weekly subscription, you will select “Week” under the Billing Period and enter 2 under “Billing Frequency” (the subscription will be charged every 2 weeks). Note that some payment gateways have restrictions on the frequency. For example, Authorize.Net requires that the billing interval be between 7 and 365 day (i.e. you can't have a subscription shorter than a weekly subscription, if you are using Authorize.Net). - Total Billing Cycles (Bill until canceled?)
Enter the total number of billing cycles. For an ongoing subscription (a subscription that never ends), answer “Yes” to the question “Bill until canceled?”, or enter 0 if there is an input field. If the subscription does end after a certain number of billing occurrences, then enter that number here. For example, if you wanted to sell a 2-year subscription that is billed quarterly, you would enter:- Month under Billing Period
- 3 under Billing Frequency
- 8 under Total Billing Cycles (4 quarters a year, times 2 years).
- Currency Code
Select the currency used by your store. - Is there a Trial period?
Indicate whether there is a Trial period or not. Note that a Trial does not have to be a “Free Trial”. In fact, the trial amount could be higher than the regular subscription amount (e.g. it may include an initial setup fee). You will specify the trial amount at the Package level. - Trial Billing Period
Select the billing interval (e.g. “Month”) for the Trial period. NOTE: with Authorize.Net, this is not supported: by default the Trial Billing Period is the same as the Billing Period. - Trial Billing Frequency
Select how often the subscription will be billed during the trial, based on the interval selected under Trial Billing Period. For example, if you want to offer a 3-month trial at a discounted price, you will select “Month” under the Trial Billing Period, enter 1 under “Trial Billing Frequency”, and enter 3 under Trial Total Billing Cycles. NOTE: with Authorize.Net, this is not supported: by default the Trial Billing Frequency is the same as the Billing Frequency. - Trial Total Billing Cycles
Enter the total number of billing cycles for the Trial Period. For a free 1-month trial, you would enter 1 here, 1 under Trial Billing Frequency, and “Month” under Trial Billing Period. NOTE: with Authorize.Net the Trial Billing Cycles (“Trial Occurrences” in the Authorize.Net documentation) are counted as part of the Total Billing Cycles (“Total Occurrences” in the Authorize.Net documentation). - Subscription Starts Immediately?
In most cases, you will answer “Yes” as the subscription will start at the time it is ordered. If there is a Trial Period, the subscription will start with the trial. Otherwise, if the subscription is set to start in the future (e.g. the first of January of the following year) select a Start Date in the corresponding field. - Start Date
Enter a Start Date if the subscription is not set to start immediately (i.e. at the time it is ordered). If there is a Trial Period, the Trial will start on the Start Date.
Viewing and Editing Existing Plan
To view all the Plans in your SubscriptionBridge Merchant Center, do the following:
- Click on Stores in the Merchant Center navigation
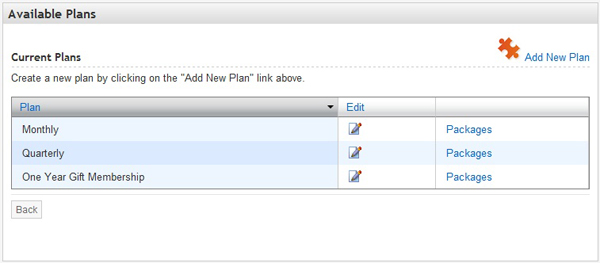
- Under any of the stores, locate the Packages section and mouse over Plans. The system will display a preview of the plans you added. Click on the link to load the list of Plans.
On the page that lists all Plans under the selected Store you can:
- Click on any column heading to sort the table by that column
- Click on Packages to view and edit existing Packages that use that Plan
Deleting Plans
Plans that are not currently used within a Package can be deleted. To delete a Plan:
- Click on Stores in the Merchant Center navigation
- Select the Store that you wish to work with
- In the Packages section, mouse over Plans. The system will display a preview of the Plans that you added to that store. Click on the link to load the list of Plans.
- Check the checkbox in the right-side column of the plan(s) you wish to remove, and click on the Delete Selected Records button to remove the selected Plans. Please note the following:
- Plans can only be deleted when not used in a Package.
- When a Plan is used in a Package, the checkbox is not shown.
- When no Plans can be deleted, the Delete Selected Records button is not shown on the page.


