Table of Contents
Subscription Terms Widget
What it is and what it displays
The Subscription Terms widget is a snippet of code that you can place on any web page and that will display a summary of a subscription package's terms to your customers. That is: a summary of the pricing and duration of the subscription product or service (i.e. subscription package). An example of what the Subscription Terms Widget would show is as follows:
FREE for the first Month
$4.00 after 1 Month Trial
Plus Tax, Shipping, and Handling
- The first two lines of the terms always display the pricing and duration of the subscription.
- The last line can be customized to say anything you want. Typically the last line is used to display information that clarifies what charges are included (or excluded) in the subscription amount that it displayed (e.g. whether taxes and/or shipping charges are included or not).
A visual example
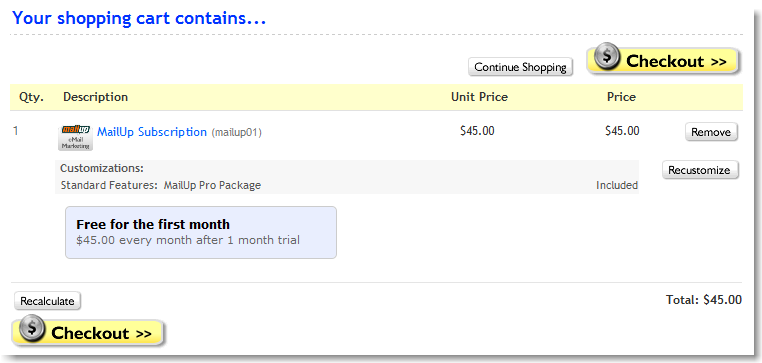
Here is an example of the Terms Widget shown on a “View Shopping Cart” page of a shopping cart that has been integrated with SubscriptionBridge. In this example the store manager has not added the option, 3rd row of text shown (the first two rows are automatically generated by SubscriptionBridge).
Installation
Do you need it?
If you are using a pre-integrated shopping cart, the widget is already installed for you, and you can skip this section.
Otherwise, we recommend that you install the widget on each product details page, as well as on the payment page. It is important (and required by the law in most countries) to let the customer view the subscription package's terms before they add the package to their cart and before they submit payment.
Installation steps
Installation (if necessary) consists of a few simple steps. SubscriptionBridge supports the two most popular JavaScript frameworks “jQuery” and “Prototype”. If you are not sure what type of JavaScript to use, then choose the first example below. Both examples will work and perform about the same. The reason why we offer both options is because some Web Developers are already familiar with one or other.
Installation Using jQuery
- Log into your SubscriptionBridge Merchant Center, select the Store and then select Package Links
- Locate the package you wish to display and click Copy to Clipboard. You now have the Link (full URL) copied to your computer's clipboard, ready to paste.
- Insert the following snippet into your website HTML.
<script type="text/javascript" src="https://www.subscriptionbridge.com/Widget/widget.js"></script> <script type="text/javascript"> GetTerms("My Package Link","ID"); </script> - Replace “My Package Link” with the Package Link that you had copied. That is, highlight that text and click “Ctrl + V” on your computer keyboard OR “Edit > Paste” with your mouse.
- Replace “ID” with any identifier of your choice. The “ID” will become the id of the HTML container that holds the widget. By this method, an “ID” allows you to use more than one widget on the same page. Use a different “ID” for each widget you place on the page. If you are not sure what you put here just use the same value as “My Package Link”.
- If your web site contains the popular JavaScript Library called jQuery you can stop now. If it does not, or you are not sure, then please insert the following, additional line of code right above previous snippet.
<script type="text/javascript" src="https://www.subscriptionbridge.com/Widget/jquery-1.3.2.min.js"></script>
Installation Using Prototype
- Log into your SubscriptionBridge Merchant Center, select the Store and then select Package Links
- Locate the package you wish to display and click Copy to Clipboard. You now have the Link (full URL) copied to your computer's clipboard, ready to paste.
- Insert the following snippet into your website HTML.
<script type="text/javascript" src="https://www.subscriptionbridge.com/Widget/widget_prototype.js"></script> <script type="text/javascript"> GetTerms("My Package Link","ID"); </script> - Replace “My Package Link” with the Package Link that you had copied. That is, highlight that text and click “Ctrl + V” on your computer keyboard OR “Edit > Paste” with your mouse.
- Replace “ID” with any identifier of your choice. The “ID” will become the id of the HTML container that holds the widget. By this method, an “ID” allows you to use more than one widget on the same page. Use a different “ID” for each widget you place on the page. If you are not sure what you put here just use the same value as “My Package Link”.
- If your web site contains the popular JavaScript Library called Prototype you can stop now. If it does not, or you are not sure, then please insert the following, additional line of code right above previous snippet.
<script type="text/javascript" src="https://ajax.googleapis.com/ajax/libs/prototype/1.6.1.0/prototype.js"></script>
Sandbox (testing environment)
If you are using the SubscriptionBridge Sandbox (testing environment for SubscriptionBridge), replace www.subscriptionbridge.com with www.subscriptionbridge.net.
Display Recommendations
Where to use it
We recommend that you use the Subscription Terms Widget:
- on the product details page, near the area where the product price is shown
- the product price is what customers will be paying today
- the Terms Widget lets them know what and when they will be paying tomorrow for the subscription
- on the “view basket” page, together with the other product information that you are displaying
- on the payment page, before the order is finalized, so that customers are fully aware of the terms of the subscription at the time of payment.
Where NOT to use it
We recommend that you do not use the Subscription Terms Widget on any page that provides historical information on the order (e.g. order details page for an order placed in the past). This is because the Terms Widget retrieves information dynamically from SubscriptionBridge, and that information might have changed since the order was placed.
You should instead rely on information saved to your system database in order to show details pertaining to the subscription, once an order has been placed.
An example
For example, let's assume that you do not have JQuery in use on your Web site already, and that your Package Link is as follows: https://www.subscriptionbridge.com/checkout/XYZMagazine. The Subscription Widget Terms code in this example will be:
<script type="text/javascript" src="https://www.subscriptionbridge.com/Widget/jquery-1.3.2.min.js"></script>
<script type="text/javascript" src="https://www.subscriptionbridge.com/Widget/widget.js"></script>
<script type="text/javascript">
GetTerms("XYZMagazine","XYZMagazine");
</script>
If there is other code already loading JQuery (e.g. your Web site uses JQuery for a navigation menu or some other JavaScript-based feature), then the code will be:
<script type="text/javascript" src="https://www.subscriptionbridge.com/Widget/widget.js"></script>
<script type="text/javascript">
GetTerms("XYZMagazine","XYZMagazine");
</script>
If you want to add two (or more) widgets on your page you can use a different “ID” in the additional instances. The “ID” can be anything you want, but must be different for each widget:
<script type="text/javascript" src="https://www.subscriptionbridge.com/Widget/widget.js"></script>
<script type="text/javascript">
GetTerms("XYZMagazine","Div1");
</script>
<script type="text/javascript">
GetTerms("XYZMagazine2","Div2");
</script>
Stying & Customizing the Widget
CSS
The Subscription Terms Widget can be customized to match the look of your web site. Each line contains a class, which can be styled with CSS. Additionally, the last line of the widget can be customized to say anything you want.
Below is a list of the CSS classes you can you use to style the widget.
- sbTermsWrapper: Assigned to the DIV that wraps around the rest of the content
- sbTerms: Styles the first line of the widget
- sbTermsSub: Styles the second line of the widget
- sbTermsCustom: Styles the last line of the widget
Here is sample CSS that will style the widget (for an introduction to CSS, see for example this Web site):
<style>

/* CSS Style for Subscription Term Widget */

/* This DIV wraps around the entire Widget */
.sbTermsWrapper {
	width: 250px;
	background-color: #E9EEFE;
	border: 1px solid  #CCC;
	margin: 10px 0 15px 10px;
	padding: 10px;
	color: #000000;
	font-size: 12px;
	text-align: left;
	-moz-border-radius: 5px;
	-webkit-border-radius: 5px;
}

/* This DIV contains the current price (e.g. "Free for the first 15 days") */
.sbTerms {
	font-family: Verdana, Arial, Helvetica, sans-serif;
	color: #000000;
	text-align: left;
	margin-bottom: 2px;
	font-weight: bold;
}

/* This DIV contains the ongoing subscription amount (e.g. "$14.95 every month after 15 day trial") */
.sbTermsSub {
	font-family: Verdana, Arial, Helvetica, sans-serif;
	font-size: 11px;
	color: #666666;
	text-align: left;
	margin-bottom: 2px;
}

/* This DIV contains additional, optional information (e.g. "Taxes added at checkout") */
.sbTermsCustom {
	font-family: Verdana, Arial, Helvetica, sans-serif;
	font-size: 11px;
	color: #6699CC;
	text-align: left;
	font-style: italic;
}

</style>
Adding and editing the third line
The text shown in the last line of the Widget (e.g. “Shipping & taxes to be added at checkout”) is defined in your SubscriptionBridge Merchant Center account.
- Log into the Merchant Center
- Select the Store that the subscription Package belongs to
- Select the Packages icon and click on View/Edit in the Descriptions column
- Select the Language tab (e.g. English) and click the Edit Package link
- Locate the section Optional Information for Terms Widget
- Edit the text and save the changes.
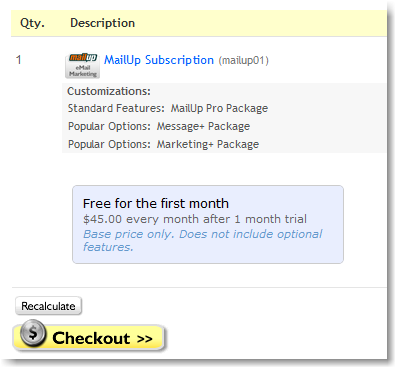
Here is a visual example of how the third line of the Widget is shown. In this example, it lets users know that the price shown in the widget is the “Base price only. Does not include optional features.”


